New to GitHub? This article will cover everything you need to know.
Table of Contents
What is GitHub?
> Introduction
> Key Features
How to Create a Repository
> Why Having a Repository is Important
> Step-By-Step (with screenshots)
How to Update Your Repository
> Step-By-Step (with screenshots)
Conclusion
What is GitHub?
Introduction
GitHub is a web platform that provides collaborative tools for software development projects. It uses Git, a version control system, to help developers track changes to their code, manage different versions, and collaborate with others. GitHub is overall used for open-source projects as well as private ones. It
contains robust collaboration tools, but can also be used for personal projects and coding challenges. Read more about Git here.
In this article, I’ll cover everything you need to know about creating a repository on GitHub. You will learn how to add, commit, and update code from your local machine. This article suits those new to GitHub with very limited experience.
Key GitHub Features:
Repositories
Repositories are where your files live. This includes code and documentation. Repositories are necessary for team collaboration because they keep track of changes and manage multiple versions of the
same project.
Branches
Branches help manage parallel development with team members. They are useful for working on different features at the same time as other team members, to be later added to the main codebase. Learn more about branches here.
Pull Requests
Pull requests are used to merge changes from one branch to another. This action lets other team members review the code before a merge. Pull requests on apply to group projects.
Documentation
Documentation includes files directly related to the repository created. They vary from a ReadMe file (which details the project’s objectives) to the management of documentation for software projects on GitHub.
Why a Repository is Important
A repository is essential because it provides version control, allowing you to track and manage changes to your code over time. It facilitates collaboration by allowing multiple contributors to work together and
integrate their changes simultaneously. Additionally, it serves as a backup for your work and supports code reviews and quality checks, ensuring a well-documented and reliable project history.
How to Create a Repository
1. Navigate to the GitHub website and make an account. Choose a professional
username and enable two-factor authentication (2FA) for security. You will then be
navigated to your home dashboard.

2. From the dashboard, navigate to the left sidebar. The left sidebar will house a
list of your top repositories. To create your first repository, click on the green
button labeled ‘new’.
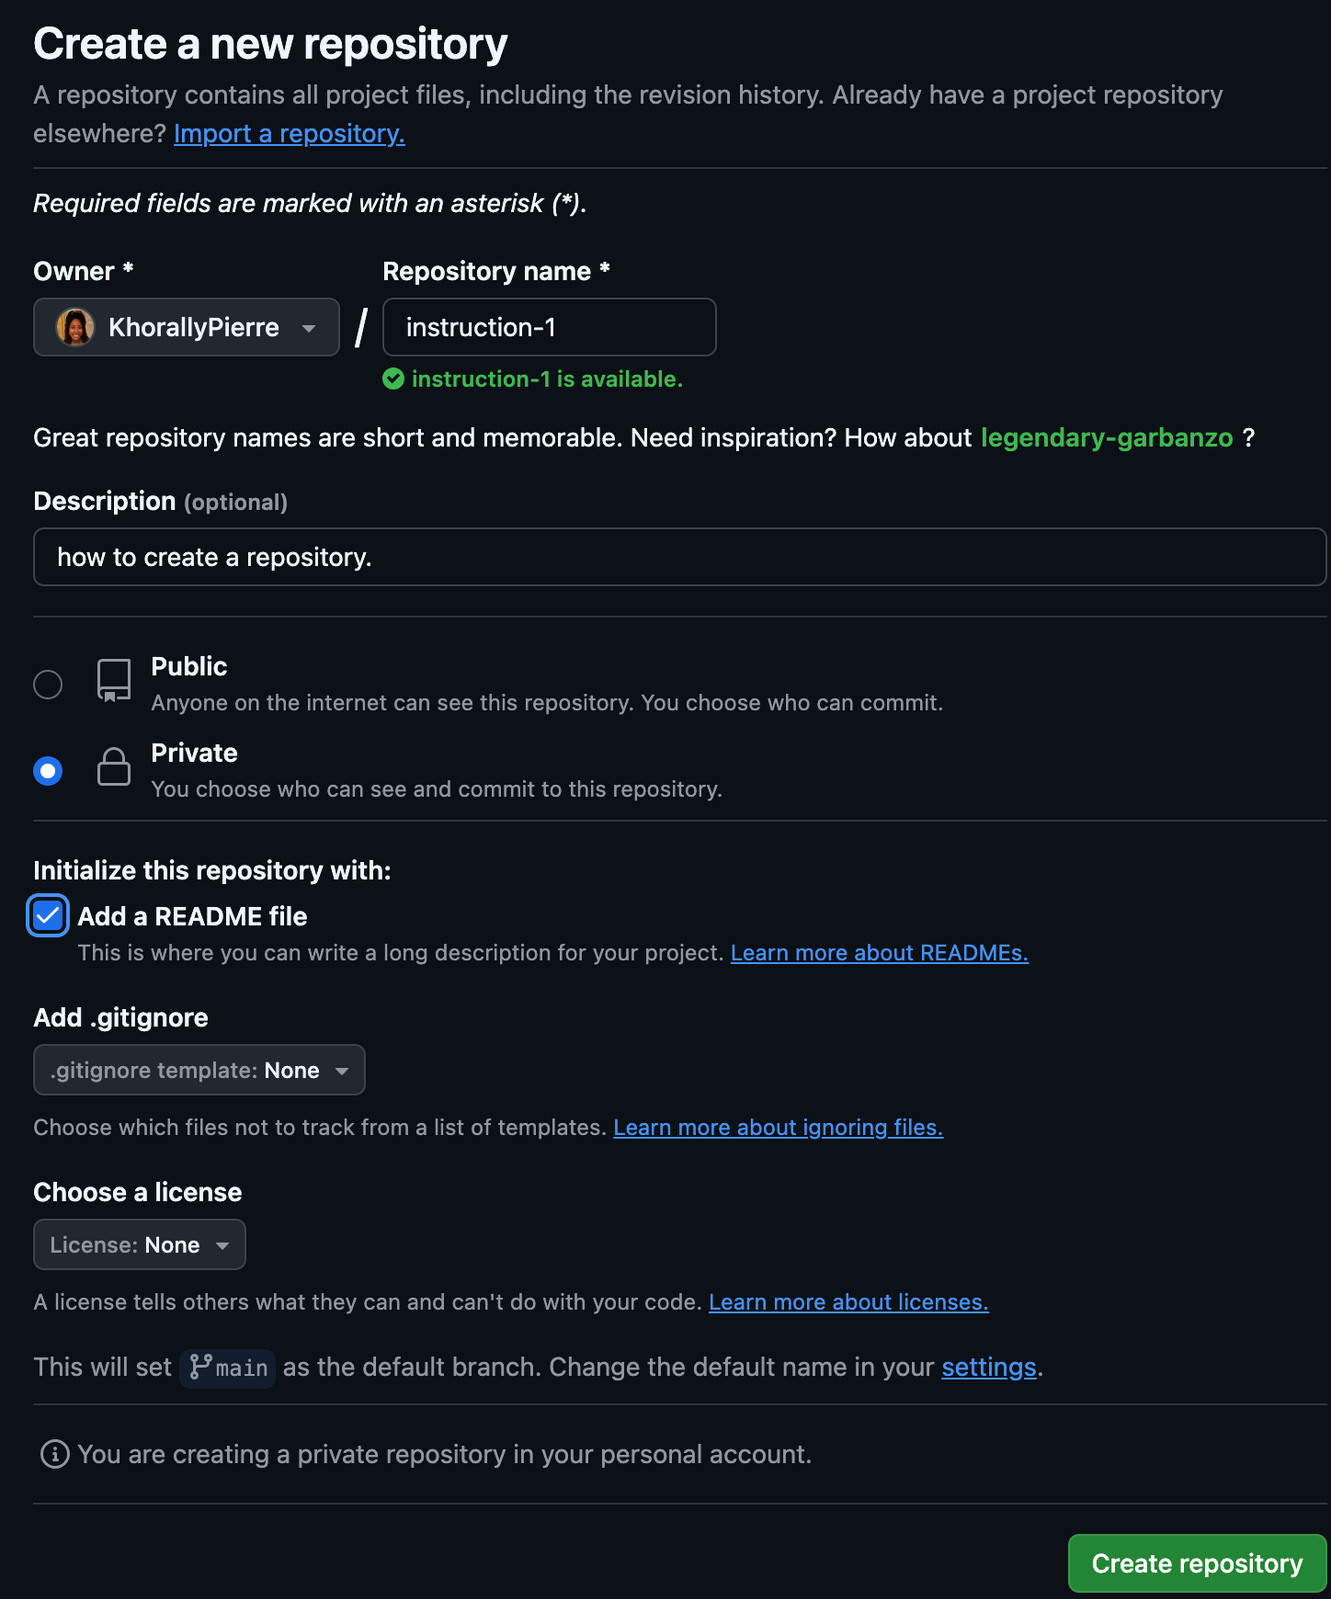
3. On the following page, choose a short and memorable name for your repository.
For this tutorial, the repository name will be introduction-1.
4. Add a brief description for your repository. A description is optional but helpful
if you plan on having collaborators or making the repository public. Since this
repository will be for first-timers, it will be made private.

5. Adding a README is optional, but having one will keep all of your future
projects organized.
6. Click the green ‘Create a Repository’ button on the bottom right corner of the
page.
How to Update Your Repository
After your repository is created, you can now add and edit files on our local machine to update the GitHub repository. All of your changes will be made from your local machine.
1. You will need a code editor on your machine to make changes. Many editors such as Atom and Notepad++ are available, but I recommend Visual Studio Code (VSCode) because it is widely used. Follow this guide to download and install VSCode.

2. Before any code or documentation can be added to the instruction-1 repository, Git, a distributed version control system that’s widely used for tracking changes in source code during software development, needs to be installed in VS code. Git commands are used in the Command Line Interface such as the VSCode terminal. Here’s a list of the most commonly used git commands among engineers, some of which will be used in this article. Install Git using this guide.

3. After installing VSCode and Git, navigate back to your GitHub dashboard and to the instruction-1 repository. To clone the repository to your computer click on the green button labeled ‘< > Code’.
4. From the pop-up modal, navigate down to the HTTPS tab, and copy the web
URL.

5. Navigate back to VSCode and open up a new terminal from the tab manager.
6. From the terminal below, choose where to clone your repository. I have cloned instruction-01 on my desktop.
7. On the command line, type the command line, enter the ‘git clone’ command followed by the web URL copied from GitHub. It should look like so:

8. Press enter to execute your command.

9. Navigate to ‘file’ from the tab manager on VSCode, and select ‘Open Folder’ to locate and open the
cloned file from GitHub. Navigate to the cloned repository, and click ‘Open’ to access the folder on
VSCode.
10. On the left sidebar, click on the first icon (circled in red) to add a new file.


11. Files created in VSCode typically include file extensions unique to its coding language. For example, introduction.js means the file will be written in JavaScript. Here’s a list of programming languages
and their unique extensions. Below is sample code for our first commit. Changes to the codebase can be
tracked by the source control icon (circled in red) for pending changes.
12. Let’s commit our changes with Git commands. Navigate back to the terminal. On the command line, type ‘git add .’ This command adds changes in the working directory to the staging area.

13. On the next line, enter the ‘git commit -m command, with a commit message. This command
captures a snapshot of the project’s currently staged changes while also describing the changes made. The terminal’s output will reveal the number of files changed and the number of lines of code added.

14. Finally, enter the ‘git push’ command, which will add your local changes to the repository on GitHub.

15. Navigate back to your GitHub repository and verify your changes. The file you updated should be rendered with all the new changes.

Conclusion
After reading this article, you’re now ready to create and manage Git repositories, track code changes, and organize your project both locally and on GitHub. With this foundational knowledge, you’ll be able to confidently initialize repositories, commit updates, and utilize GitHub for effective collaboration and version control. This skillset will streamline your workflow, improve team collaboration, and help you maintain a well-structured codebase.

Read more
